 Australia

What good is a cheap travel eSIM if it works at the hotel but fails along the driving route, or leaves a traveller unsure whether the phone can make an emergency call?
The best eSIM for Australia is the plan that matches the handset, the route and the way the traveller uses data. A city break, a working holiday and an outback drive need different checks. Price matters, but a usable connection and an emergency-ready phone matter more.
Quick Picks for an Australia eSIM by Trip Type
| Trip type | Data to buy | What to prioritise | Starting price |
|---|---|---|---|
| Short city stay, under a week | A small allowance for arrival tasks, maps and messages | Low price, instant QR delivery | RedSim's Australia eSIM costs $2.69 for the smallest tier |
| Road trip through regional towns | Navigation and messaging allowance, with offline maps downloaded | Named Australian host network and route coverage | From $2.69 for the smallest tier; a mid-size allowance suits daily maps and messaging |
| Multi-country trip with Oceania stops | An entry allowance, then more for longer stays | A regional plan covering every stop | $5.19 for an Oceania regional plan with 1 GB for 7 days |
| Remote worker using a laptop hotspot | A larger allowance based on actual laptop consumption | Hotspot support, usage tracking and sustained performance | $26 for an unlimited 7-day Oceania plan with tethering support |
| Family sharing one data pool | Each person's expected usage added together | Tethering across devices and a phone that stays with the group | From $2.69 per line, or one larger allowance shared by hotspot |
Australia eSIM quick picks by trip type: these are buying categories, so they don't rank plans by price per gigabyte. The smallest tier suits arrival transport and occasional messages, provided its validity covers the stay. A larger allowance cannot repair a coverage gap.
Three checks decide which category fits:
- Device compatibility: the exact handset must support eSIM and work on Australian networks.
- Named Australian host network: the plan should identify the network available along the itinerary.
- Data against the itinerary: the allowance must cover the apps, devices and travel days involved.
Read the tier details before paying
Validity, voice service, hotspot access and top-ups decide which tier makes sense once the allowance looks right. The checkout page should state whether validity starts at purchase, installation or first connection. Those events are not interchangeable.
A traveller who needs ordinary calls should look for an Australian phone number, voice minutes and SMS on the plan itself, because a data connection alone supplies none of them. For a shared connection, hotspot permission has to apply to the selected tier, confirmed on that plan's own checkout page. Usage tracking and the option to top up the active eSIM without a replacement QR code are worth having, since consumption rarely matches the original estimate.
For families, one shared connection works best when everyone stays together. Separate plans are more practical when adults split up, children travel with different relatives, or the hotspot phone might leave the accommodation.
How Much Data to Buy for Your Australia Trip
Start with the phone's existing usage record, not a generic daily allowance. In Settings, open Mobile Data, Cellular or Data Usage and check the period shown. A lifetime counter or an old billing period won't provide a useful estimate.
Divide the recorded consumption by the days it covers, then multiply by the trip length. The result is a starting budget, not a guarantee. A traveller who normally relies on office Wi-Fi may use substantially more mobile data while away.
Compare habits rather than labels
The following is a hypothetical sizing worksheet, not measured app consumption. Its daily budgets illustrate how a traveller might translate expected use into a weekly allowance.
| Usage profile | Daily use in this example | Suggested 7-day allowance in this example | What it covers |
|---|---|---|---|
| Light | 0.3 to 0.4 GB | 2 to 3 GB | Messages, maps and email |
| Moderate | 0.7 to 1.4 GB | 5 to 10 GB | Social media, music and navigation |
| Heavy | 2 to 3 GB | 15 to 20 GB | Video calls and a laptop on hotspot |
Actual consumption changes with video quality, downloads, cloud syncing and background activity. A laptop can use the connection for software updates or file backups without its owner actively browsing.
For example, a traveller estimating 10 GB for a trip might choose 13 GB as a personal contingency budget. That extra allowance is a planning choice, not a measured requirement for Australian travel.
Practical rule: A hotspot budget should include the laptop's background activity, not just the time spent in meetings.
Reduce waste before increasing the allowance
Download maps, playlists and entertainment over Wi-Fi. Pause automatic photo uploads and operating-system downloads on mobile connections, especially on a tethered computer.
A small starting tier can be sensible when top-ups are available and usage is easy to monitor. It's less convenient when a traveller expects to spend long periods away from reliable internet access and might struggle to purchase more data.
The plan-selection guide helps organise the choice around destination, duration and expected usage. For work trips, use the laptop's actual consumption as the starting point; for leisure trips, begin with ordinary phone habits and allow for more navigation and sharing.
Check Your Phone Before You Buy
An Add eSIM button doesn't prove that a phone will work properly in Australia. It establishes only part of compatibility. Carrier restrictions, the exact model variant and network support still matter.
Start with the carrier lock. On an iPhone, look under Settings, General and About for carrier-lock information; Android menus vary, so the home carrier may need to confirm the status. A phone bought on instalments may still have restrictions even when its owner can install other apps and travel services.
Next, check eSIM support through the phone's SIM settings and the manufacturer's documentation. Match the complete model identifier, not just the retail name, because regional versions can differ.
Match the handset, not just the brand
The compatible-device guide provides a starting point for checking eSIM capability. The manufacturer or Australian network should also confirm support for the handset's radio bands and VoLTE, the technology used for voice calls over LTE.
For a second-hand handset or an unclear model history, myhalo explains how to check a phone's IMEI safely. An IMEI check can help identify the device, but it doesn't replace confirmation of Australian network and emergency-calling compatibility.
Use this purchase checklist:
- Open: Other carriers' SIM profiles are permitted.
- eSIM-capable: The exact regional model supports digital SIM installation.
- Updated: The operating system and available carrier settings are current.
- Network-compatible: Australian bands and VoLTE support have been confirmed.
- Backup-ready: An older or uncertain handset has a supported alternative.
If any item remains unresolved, postpone the purchase. Written confirmation tied to the exact model is more useful than a broad statement that a brand is supported.
How to Install an Australia eSIM Step by Step
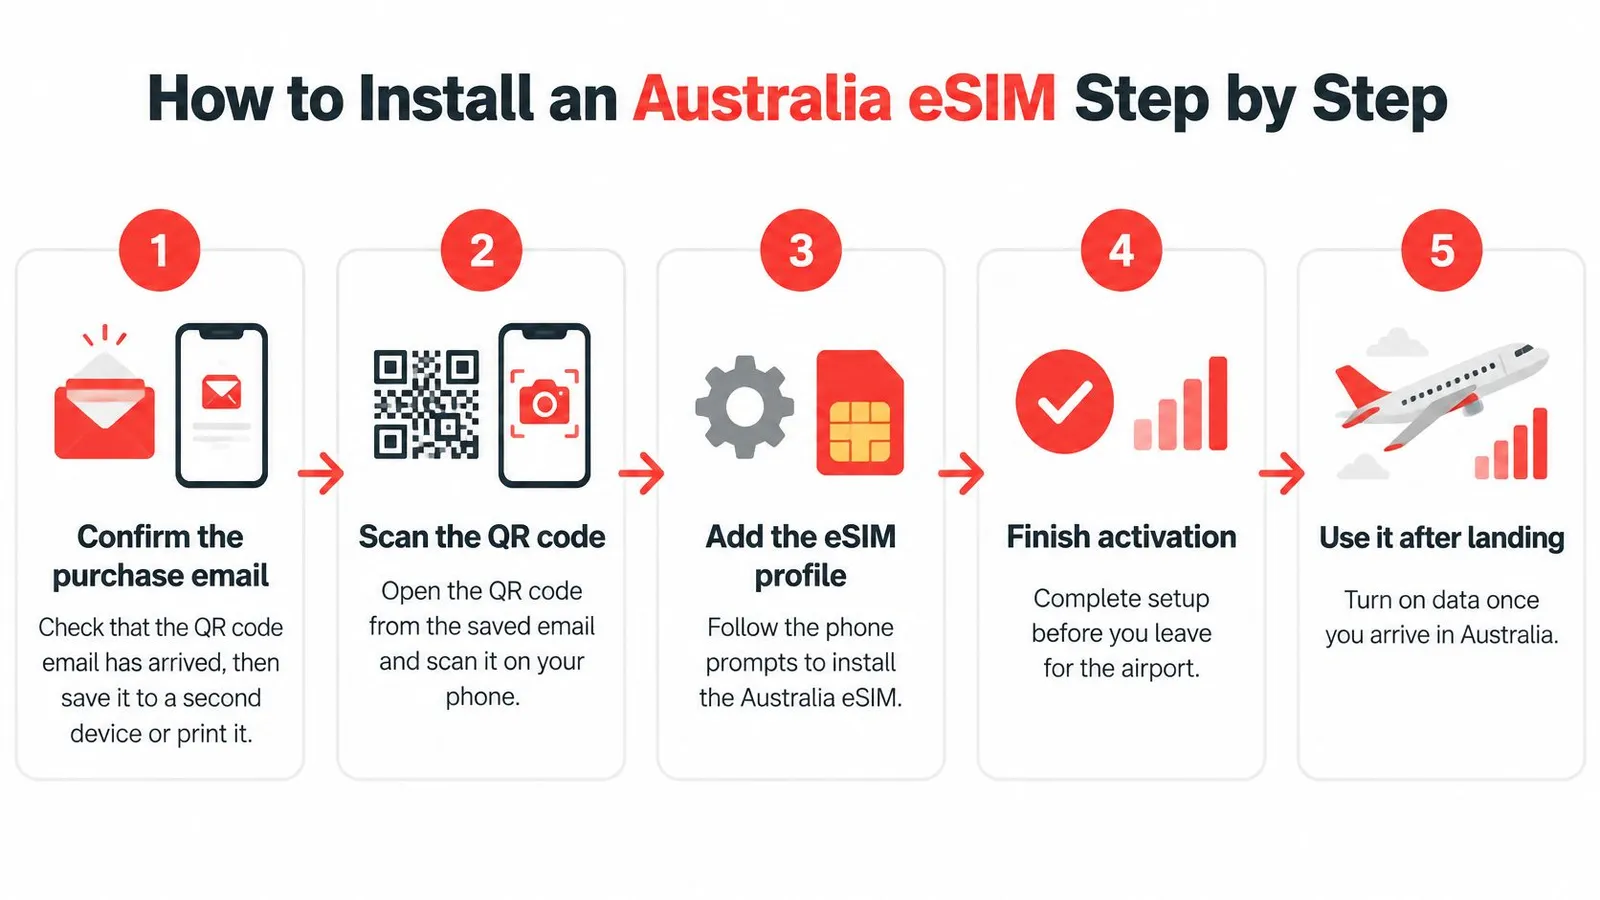
Install the profile using a dependable home Wi-Fi connection, provided the plan's activation rules allow installation before departure. Installation and the start of paid validity aren't necessarily the same event.
The purchase email, account login and setup instructions should remain accessible without relying on the new mobile connection. Saving the QR code on another screen avoids the awkward task of trying to scan a code displayed on the same phone.
Install and label the profile
- Confirm delivery. Find the purchase email and save the QR code to a trusted second device or print it. Keep the order reference too.
- Connect the phone to Wi-Fi. Open Settings, then Mobile, Cellular or SIM Manager, and choose Add eSIM.
- Scan the code or use the supported app installation. Follow the prompts until the phone confirms that the profile has been added. Don't repeatedly rescan a code after a successful installation.
- Name the line Australia. A clear label makes it easier to distinguish the travel connection from the home number when changing settings.
The installation help guide should remain saved alongside the purchase details. If a menu differs from the instructions, check the device-specific path rather than deleting the profile and starting again.
Set the data line deliberately
- Choose the travel line for mobile data when the trip begins. Keep the home line available for calls or texts if needed and supported by the handset.
- Enable data roaming on the travel line when its instructions require it. Disable data roaming on the home line, and turn off automatic cellular-data switching if it could send traffic through the home carrier.
- After landing, check registration and internet access. The phone should connect to an eligible Australian network, and a webpage should load with Wi-Fi switched off.
Keeping a home SIM enabled doesn't make all its services free. Calls, voicemail and other roaming services remain subject to the home carrier's terms.
Install the profile early when permitted, but don't start the validity clock early by assumption.
Before leaving the airport, load a fresh webpage and search for a destination in the maps app using mobile data. A cached page isn't a reliable test. Download the required offline map area while Wi-Fi is still available.
If the connection fails, check the selected data line, roaming setting and any access-point instructions first. Avoid deleting the eSIM unless support specifically recommends it, because reinstalling may require assistance.
Network Coverage Beyond the 5G Icon
A 5G icon isn't a performance guarantee. It identifies a network technology, not the capacity available to the traveller at that location. A phone can display a connection while struggling to upload a document or maintain a call.
Signal strength is expressed in dBm. More negative readings indicate weaker received power, but signal strength alone doesn't describe congestion, latency or the quality of the whole connection.
Understand the coverage categories
The national mobile-coverage audit methodology describes fair coverage below -115 dBm, moderate ranges of approximately -115 to -122 dBm for 4G and -115 to -126 dBm for 5G, and weaker readings as limited.
| Coverage class | 4G signal | 5G signal |
|---|---|---|
| Fair | Below -115 dBm | Below -115 dBm |
| Moderate | -115 to -122 dBm | -115 to -126 dBm |
| Limited | Weaker than the moderate range | Weaker than the moderate range |
Australian signal thresholds for 4G and 5G: these descriptions shouldn't be treated as clean, non-overlapping speed guarantees. The fair wording overlaps the weaker ranges, so practical usability still needs checking.
As reception weakens, the phone may transmit less efficiently and resend packets. That can reduce throughput, increase delay and use more battery before the connection disappears entirely.
For an itinerary continuing to New Zealand, the Mobile Systems guide to coverage maps provides useful context for interpreting that country's maps. It isn't evidence of coverage in Australia.
Test the task that matters
- Load a fresh page. Notice whether text and images arrive promptly.
- Start a video call and check both incoming audio and outgoing speech.
- Change location. Repeat near a window or outside the building.
- If performance remains unstable, try another permitted network or move important work to a dependable connection.
Manual network selection only helps when the plan authorises access to the alternative network. The slow-data troubleshooting guide can help separate a configuration problem from weak reception.
Regional and Road-Trip Coverage Gaps
Population coverage isn't geographic coverage. A network can reach most residents while leaving substantial stretches of road outside its footprint. A city-speed comparison therefore says little about a national-park visit or an inland drive.
The ACCC's 2025 Mobile Infrastructure Report shows that 85.4% of TPG's mobile sites were in Major Cities, illustrating why site distribution matters when assessing regional travel.
A national operator ranking still can't settle the purchase. The traveller needs to know which host network the particular eSIM can access, whether its roaming agreement includes the relevant coverage, and whether the handset supports that connection.
Check the route as separate stretches
| Route setting | What to check | What to prepare |
|---|---|---|
| City accommodation | Indoor reception and the actual building location | Booking details saved locally |
| Regional town | Coverage at the accommodation and nearby roads | Downloaded maps |
| Highway | Gaps between towns, not just coverage at stops | Route and expected arrival shared with someone |
| Wilderness or remote desert | Whether any mobile network serves the area | An appropriate non-mobile communication option |
A second SIM is useful only where its network provides service. It isn't a substitute for satellite communication where no terrestrial network is available.
A covered town at each end of a drive doesn't establish coverage between them.
Travellers carrying satellite internet equipment also need a workable power setup. Revolink Satellite Gear explains how to check compatible 100W vehicle power sources, a separate equipment-planning task rather than a way to improve an eSIM's reception.
Regional and global plans can simplify border crossings, but their country lists don't establish wilderness coverage. Before a remote stretch, save tickets and bookings offline, arrange check-ins and choose a backup that suits the route.
Calling 000 With a Data-Only eSIM
Australia's emergency number is Triple Zero (000), calls are free, and a mobile can attempt to use another available Australian network, though it must still be within coverage of at least one, according to ACMA's emergency-calls guidance.
A data-only travel plan can handle maps, messaging and internet calls while carrying no Australian number and no ordinary voice or SMS service. Connectivity and emergency readiness are separate checks. The handset matters as much as the plan: an imported phone that lacks compatible calling support can fail to place calls at all, and installing an eSIM will not change that.
Prepare without making a test emergency call
- Finish the handset checks first: Emergency calling rests on the same compatibility covered when checking the phone before purchase, so confirm it passed before relying on the device.
- Update the handset: Install available operating-system and carrier updates before departure.
- Retain ordinary voice access where needed: Keep the primary SIM available if calls are part of the travel arrangement, subject to its roaming terms.
- Locate the emergency screen: Confirm how it opens from the lock screen without placing a test call.
- Keep internet calling separate: WhatsApp and similar apps aren't substitutes for calling emergency services.
Practising the lock-screen dialler saves time if a call becomes necessary. Opening it shows only that the interface is reachable; a completed call still requires a compatible handset inside coverage.
A highway example
A driver whose data-only plan loses its partner network on a highway can still place a 000 call if the handset is supported, because the phone may attempt the call through another available Australian network. An incompatible imported phone may fail to complete that same call.
An active home SIM adds a second line, subject to its roaming terms; it adds neither handset support nor coverage. Where no terrestrial network reaches the road, a 000 call depends on a non-mobile option chosen before the drive.
Confirm Your Plan Before You Land
Departure day is too late to discover a problem with an eSIM. The last check works best as a short timeline, run while there is still time to switch tiers, update the handset or arrange a fallback.
A day-before departure timeline
- 24 hours before the flight: Confirm the allowance, expiry rule, eligible countries and host network against the itinerary.
- The evening before: Install the eSIM profile over Wi-Fi and confirm when the plan's validity period starts, so a multi-week allowance doesn't begin counting down before landing.
- Before leaving for the airport: Assign the eSIM to mobile data, keep the primary line on voice if calls are part of the trip, and download offline maps for the arrival city.
- On landing: Enable the eSIM and test the connection at the terminal before relying on it for transport or navigation.
A plan that activates on installation rather than on first network connection loses days of validity if installed a week early. Knowing the activation rule protects the allowance as much as the data amount does.
For travellers continuing beyond Australia, a regional Oceania eSIM is worth weighing against separate country plans: one version offers 1 GB for 7 days at $5.19 and an unlimited 7-day option at $26. Compare the covered destinations and each tier's conditions before assuming the regional option fits the route.
Keep the emergency preparation notes with the offline itinerary rather than buried in an email account.
RedSim offers travel data plans for Australia and multi-country itineraries, with digital installation, hotspot sharing and usage tracking. Visit RedSim to compare a tier against the trip's dates, handset and route.