Most iPhones from the iPhone XS onward support one physical SIM plus one eSIM, and iPhone 13 and later also support dual eSIM. On the right model, the real problem isn't hardware, it's making sure the home line, travel data, carrier policy, and roaming settings don't fight each other.
A traveler lands, switches off airplane mode, and expects data to work. Instead, the phone shows signal but the wrong line is carrying data, the bank OTP arrives late, or the second line never activates because the carrier blocks it.
Why iPhone Dual SIM Matters for Travel and Work
A frequent flyer shouldn't have to choose between staying reachable and getting online. One line needs to keep calls, codes, and family messages flowing, while the other line should handle maps, ride apps, and work data the moment the plane door opens. That's the value of iPhone dual SIM, not novelty, but control.
One phone, two jobs
A good dual SIM setup lets a phone act like two devices without the baggage. The home number stays active for verification texts and familiar callers, while the travel line absorbs the data load on local networks. That keeps the setup cleaner than carrying two phones or gambling on airport Wi-Fi.
This matters most when plans change mid-trip. A delayed connection, a new hotel, or a last-minute client call can't wait for SIM swaps or a fresh hotspot login. A proper configuration gives a traveler predictable access and fewer surprises, which is exactly why the feature became mainstream across Apple's ecosystem. Apple's support documentation shows the feature now spans a broad range of iPhones, and that the platform stores up to eight or more eSIMs on one device, which goes far beyond old-school SIM swapping (Apple dual SIM and eSIM support).
Practical rule: Keep the number people already know on the home line, and let the travel line do the roaming work. That separation cuts confusion fast.
What the setup is really solving
The hard part isn't adding a second line. The hard part is making sure the phone uses the right line for the right task, without sending data over the wrong route in the background. Apple's own guidance makes that clear by tying dual SIM behavior to default line selection, carrier support, and roaming settings rather than to a single switch (iPhone dual SIM setup guide).
That's why travel eSIMs are useful in the first place. A service like RedSim global eSIM plans fits the same use case, giving a traveler a separate data line instead of forcing the home carrier to do everything. The right setup keeps the home number reachable and the travel data predictable, which is the whole point.
iPhone Models and Region Rules for Dual SIM
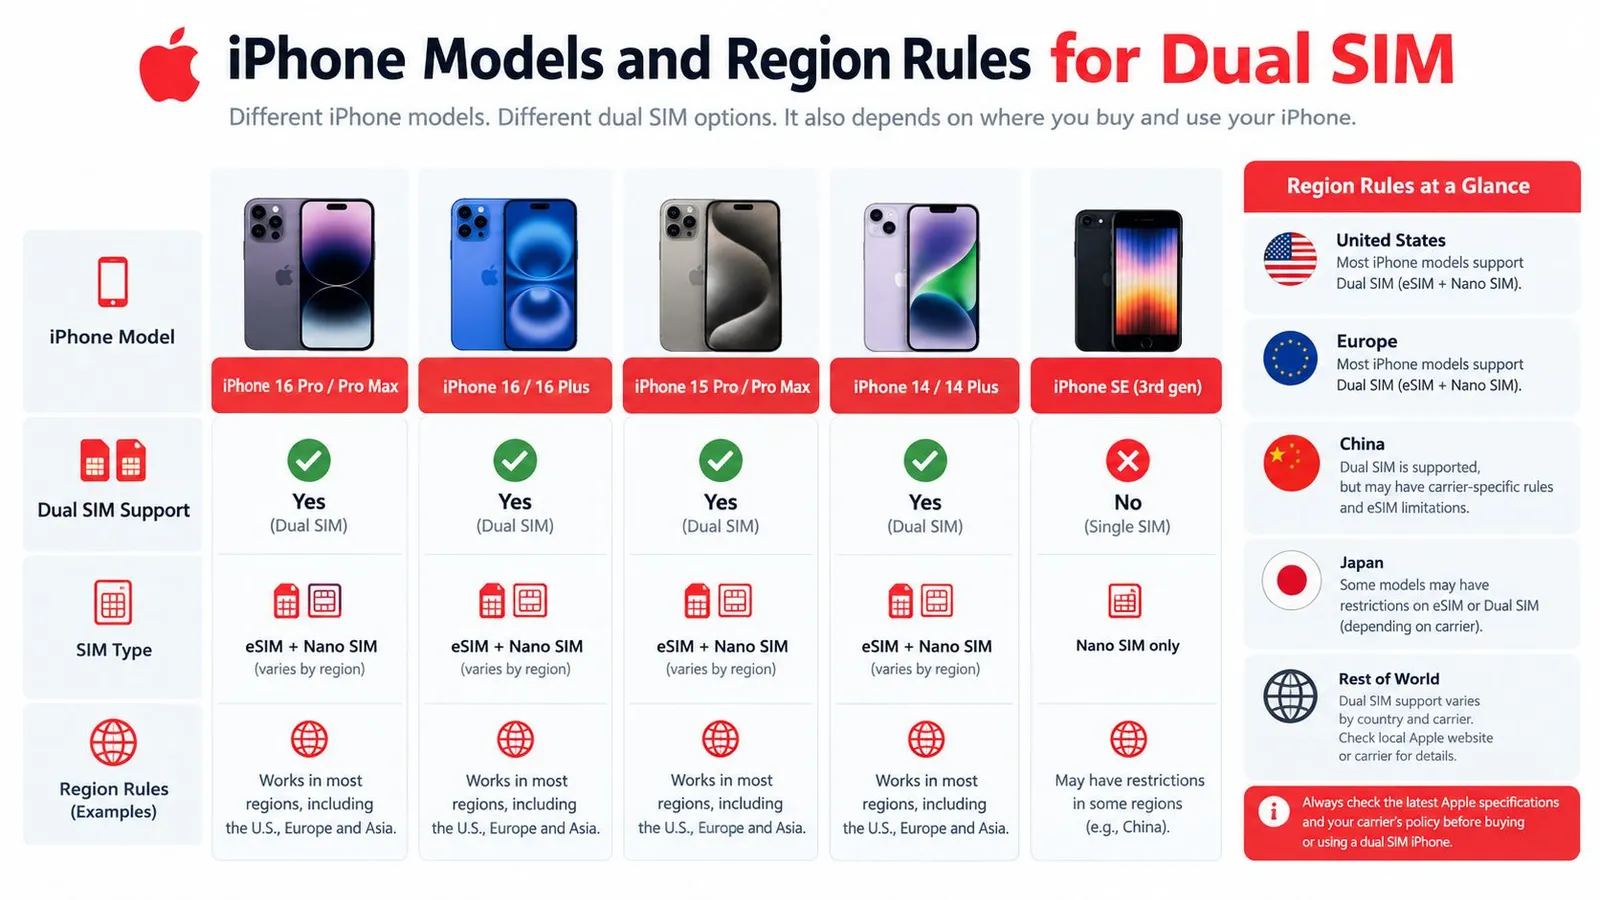
Apple's dual SIM story starts with the iPhone XS, iPhone XS Max, and iPhone XR in 2018. From there, Apple expanded the model list, and now iPhone 13 and later can use two eSIMs on supported configurations, while many models from the iPhone SE (2nd generation) through later generations support one physical SIM plus one eSIM (Apple dual SIM and eSIM support).
Model year is not enough
A device can be the right year and still be the wrong variant. Apple says all iPhone 14 or later sold in the United States are eSIM only, so there's no physical nano-SIM tray at all on those U.S. models (Apple eSIM deployment guide). That's a big shift, and it matters because travelers often assume every iPhone in the same family behaves the same way.
Regional rules complicate this further. Apple also notes that in China mainland, and on some models in Hong Kong and Macao, support can differ and may use dual nano-SIM instead of the U.S. pattern (Apple iPhone dual SIM guide). A phone's tray layout and eSIM behavior depend on the market version, not just the badge on the back.
How to verify the phone before anyone starts scanning QR codes
The quickest check is in Settings > General > About. On supported phones, Apple and the device guidance show an EID line there, which is a good sign that the phone can handle eSIM provisioning. The phone also has to be carrier independent if the goal is to use two carriers on one device.
If the phone is locked, the setup problem isn't dual SIM. It's carrier policy.
For device matching, RedSim compatible devices is useful as a sanity check before purchase. That kind of check saves time because dual SIM readiness depends on both the model generation and the market version, not on assumptions.
How to Set Up Dual SIM on iPhone
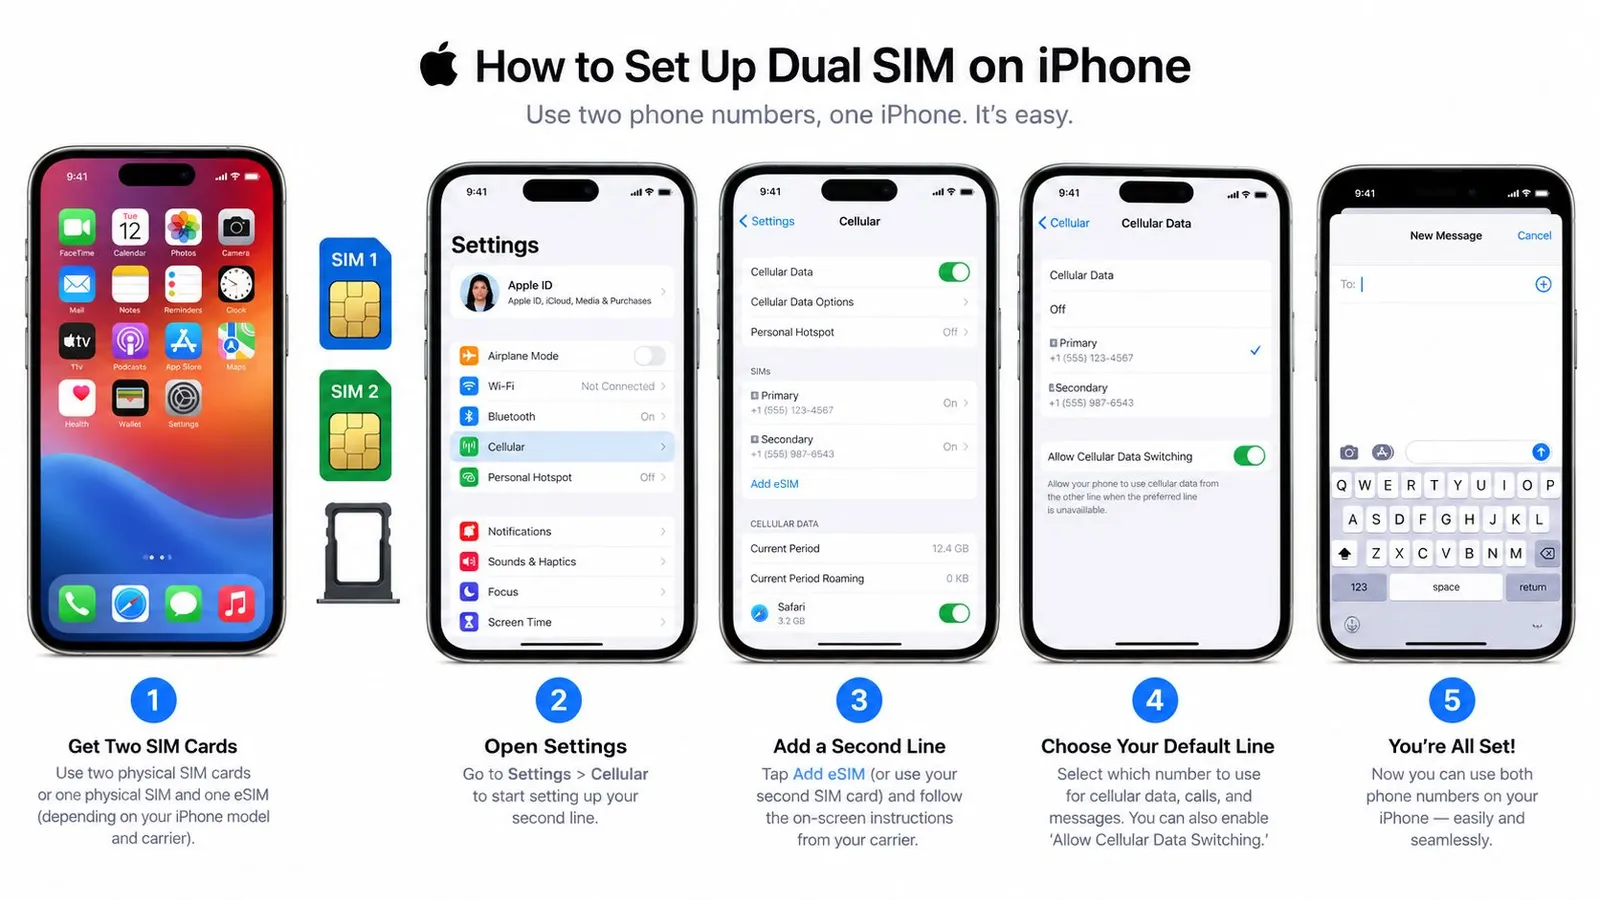
Start with the basics. The iPhone should support dual SIM, the device should be carrier-free, and the intended use should be clear, whether that means keeping the home line for voice and SMS or shifting data to a travel eSIM. Apple's setup flow is straightforward once those pieces are in place: insert the physical SIM if needed, then go to Settings > Cellular > Add eSIM and choose the activation method the carrier or provider supports (Apple iPhone dual SIM guide).
Add the travel line first
For most travelers, the travel eSIM should be added before departure or immediately after landing. Apple documents QR-code activation and on-device setup, and its deployment guidance also covers carrier QR delivery through Mail or Safari on newer iOS versions (Apple eSIM deployment guide). That means there's no need to hunt for a plastic SIM tray or a pin in an airport lounge.
A provider with app-based install can simplify this step further. The result is the same, a second line appears on the phone, ready for labeling and default-line selection. For a clean setup, RedSim's setup help is the sort of support page worth checking before activation day.
Label the lines and set the defaults
After activation, label the lines clearly. Personal, Work, and Travel are better than leaving the phone to guess which line should do what. Apple's guidance makes line labeling part of normal Dual SIM setup, and that matters because the wrong default voice or data line causes most of the confusion.
Set the default voice line to the number people should call most often. Then set Cellular Data to the line that should handle internet abroad. That split keeps calls and data from colliding in the background.
Best practice: label first, then choose defaults. If the labels are vague, the mistakes start later and cost more time to fix.
Decide on data switching before the trip starts
The last setting that matters is Allow Cellular Data Switching. If the goal is predictable travel data, it usually belongs off, because Apple says the phone can use either line for data depending on coverage and availability when this setting is enabled (Apple cellular data switching guidance). Leaving it on can be convenient at home, but it invites the wrong line to grab data when roaming.
That's the point where a completed setup becomes a controlled setup. Two labeled lines, one clear voice default, one data default, and no guessing when the border crossing happens.
Configuring Dual SIM for International Travel
A remote worker landing in a new country should keep the home SIM in place for calls and texts, then use the travel eSIM for data. That split is cleaner than swapping cards and safer than hoping the home carrier's roaming fees stay reasonable. It also keeps verification codes flowing on the number tied to banking, login alerts, and work systems.
Keep voice on the home line, data on the travel line
The cleanest setup is simple. The physical SIM stays active for calls and SMS, while the travel eSIM handles mobile data. That way the phone still reaches the home network for inbound contact, but the internet traffic moves through the travel plan.
For a trip where the data line matters more than the voice line, the travel eSIM should be labeled clearly and selected as the Cellular Data line. Turn Data Roaming on only for the travel line, not for the home line, so the phone doesn't route ordinary browsing through the wrong carrier abroad. Apple's guidance on international travel makes the default-line and roaming choices part of the core setup, not an afterthought (Apple international eSIM travel guidance).
Stop the home line from drifting onto data
The key trap is Allow Cellular Data Switching. If that stays on, the phone may use whichever line has coverage or availability, which is useful in some domestic edge cases but messy for travel. Apple documents that the setting can be enabled or disabled in cellular settings, and for controlled roaming it's usually smarter to keep it off (Apple cellular data switching guidance).
That one choice prevents a classic problem. A traveler thinks the travel eSIM is doing all the work, then a background refresh or app update taps the home line instead. The result is confusion, not convenience.
A practical configuration looks like this:
- Physical SIM: keep it active for voice and SMS.
- Travel eSIM: set it as the cellular data line.
- Data Roaming: enable it only on the travel line.
- Cellular Data Switching: leave it off for predictable behavior.
- Labels: name the lines so the phone screen says what each one does.
Travel rule: the line that receives your OTPs should not be the line that pays for roaming data unless that's a deliberate choice.
For route planning and destination coverage, RedSim's destination list is useful because it helps match the data line to the actual trip, not just the country name on the booking confirmation. When the settings are tight, the phone behaves like a managed tool instead of a roaming gamble.
Choosing an eSIM Provider for iPhone Travel
A travel eSIM provider should be judged on coverage, activation speed, support, and how well it handles changes mid-trip. Price matters, but only after the service proves it can activate quickly and keep the traveler online when the flight lands or the itinerary changes. The wrong choice saves a small amount upfront and creates a much bigger problem later.
What to compare before buying
Coverage comes first. A traveler with a single-country trip needs a different plan than someone crossing borders every few days. Country plans, regional plans, and global plans each serve a different pattern, and the best fit depends on how often the phone needs to roam.
Activation speed matters just as much. QR delivery is convenient, and in-app installation is even better when the phone supports it because the line can be installed without juggling email and camera apps. Hotspot sharing also matters for people who carry laptops or tablets, because the phone then becomes a travel data hub instead of a one-device pipe.
Support quality is the final filter. If the line fails at 2 a.m. after landing, human help through chat or WhatsApp is more useful than a polished FAQ. Refund handling also matters, especially for unused eSIMs that were bought early but never activated.
Where RedSim fits in that comparison
RedSim is one option in this category. It offers eSIM mobile data plans for international travel and business in more than 200 destinations, with instant provisioning through QR code or 1-click installation in its iOS and Android apps, plus 24/7 WhatsApp and email support. It also lists country, regional, and global plans, along with top-ups and refunds for unused, unactivated eSIMs, and it shows examples such as a United Arab Emirates eSIM from $2.95 and a Global eSIM from $6.15 (RedSim comparison page; UAE eSIM; Global eSIM).
That doesn't make it magic. It just means the product is built around the same travel problems this guide cares about, activation speed, coverage scope, and support when the phone has to work immediately.
Choose the provider that makes setup boring. That's a compliment, not a criticism.
Troubleshooting Dual SIM and eSIM Issues
Most Dual SIM failures are not hardware failures. They happen because the phone is locked, the carrier doesn't allow the exact combination, the billing setup is blocked, or the user left the wrong line in control of data. That's why the first fix should be policy, not panic.
Confirm the account and carrier side first
If the iPhone is network-restricted, dual SIM with another carrier can stall immediately. Apple also says Dual SIM with eSIM only works when the phone is not network-restricted or when both plans come from the same carrier, so that's the first thing to verify (Apple carrier compatibility guidance). If the setup is for an enterprise or corporate account, Apple explicitly says to check whether the company or carrier supports the feature.
Billing can break the second line too. A plan may be technically correct but still fail because of an account block, a service issue, or unsupported coverage in the destination. That's why “the phone is fine” and “the SIM is active” are not the same thing.
Separate provisioning problems from phone problems
A second line that refuses to activate is often a provisioning issue, not a broken device. Apple notes that service outages, billing-related blocks, and unsupported coverage can all prevent Dual SIM from working correctly, which means the account can be the problem even when the screen looks normal. The useful question is not “is the phone defective?” but “which layer failed, the device, the carrier, or the settings?”
On iPhone, the relevant settings are in Settings > Cellular. That's where the default voice line, data line, and cellular data switching choice live, and each one can change how the phone behaves once both lines are present. A setup that seems unreliable often becomes stable once those choices match the travel plan.
Fix the common failure path in the right order
- Check device freedom first: confirm the device is carrier released before trying a second carrier.
- Verify both lines are active: a half-finished activation often looks like a bad device.
- Review billing and enterprise rules: corporate plans and account restrictions can block the second line.
- Inspect data switching: if data jumps to the wrong line, disable switching and set the travel line manually.
- Test coverage separately: a line can be active and still fail in the destination because the carrier doesn't support that setup there.
If the setup fails after those checks, the issue is usually policy or provisioning, not the iPhone itself. That's the point where carrier support becomes necessary, because the device can only do what the account allows.
Final Dual SIM Setup Checklist
Before departure, the phone should pass a simple checklist. The iPhone must support Dual SIM, the device should be free of carrier restrictions, both lines should be activated, and each line should have a clear label so no one has to guess which number does what. The travel eSIM should be the Cellular Data line, and Data Roaming should be enabled only on that line.
The last things to verify
- Device support: confirm the model supports the SIM setup you want.
- Unlock status: make sure the iPhone is not tied to a carrier.
- Activation: verify both lines are fully active.
- Line labels: name the lines Personal, Work, or Travel.
- Data line: set the travel eSIM as the default for cellular data.
- Roaming control: turn on Data Roaming only for the travel line.
- Data switching: disable Allow Cellular Data Switching if the home line must stay off roaming data.
That checklist keeps the setup focused on the primary goal, which is to make the phone dependable across borders. It also avoids the most common mistake, assuming the second line will behave itself without explicit defaults.
If the setup still feels uncertain, the issue is usually carrier policy or provisioning, not the iPhone.
Around-the-clock support and refund-friendly policies matter most when a trip is already underway. Unused eSIMs can often be refunded if they were never activated, which gives a traveler a margin of safety instead of a sunk cost.
RedSim gives travelers and remote workers a way to keep the home number alive while routing data through a separate travel line, which is exactly what Dual SIM is for. For trips where the phone has to work on arrival, visit RedSim and choose the eSIM plan that matches the route, the device, and the roaming settings already in place.